Threadbenders Quilt Shop

Threadbenders Quilt Shop

Wednesday, May 7, 2014

Machine Applique: Fast As We Can

We know about quilting as zen. People always ask me about my patience. They have no idea. I've no patience at all. I want that baby done.
Machine applique is often the answer for that. There are myriad techniques that go from hand sew look alikes to raw edge wonders. We'll explore those today.


The secret about machine applique is that you want it to stay put while you stitch it down. Reasonably enough. The simple answer to that is our last blog post. If you want to stitch by machine, you fuse it as a basting.

Couldn't you just trust the glue and not stitch it? Sure. I can also trust two dogs not to touch a baked chicken that's landed on the floor. We can do almost anything. But some things just don't work the way you would like. Glue is not always permanent, not always applied well enough and not always trustworthy by itself. You could get lucky or not. If you want it to stay stuck, stitch it down.

From Julie Baird at Generations
 The applique can either be turned under or not. This is a surprisingly strong method


Karen Woodruff
Straight stitch applique. 
You can just run a stitch along the edge. It gives a modern and wild kind of look that can be a lot of fun. It needs some kind of other reason to stay on. I'd fuse it first.
From Ellen Luckett Baker at The Long Thread

Zigzag applique:
Fed zigzag applique ( with the feed dogs up) gives a solid blocky line. It's a nice finish that's very durable.

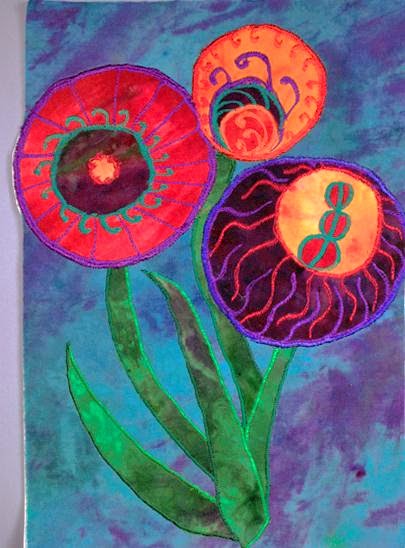
From Thread Magic Garden Ellen Anne Eddy


Free motion applique: This is applique done with a darning foot zigzag. It gives a more fluid line that can be shaded with more stitching.

What ever you choose, you'll be done in a flash. And sometimes that's just what you need.

Sunday, May 4, 2014

The Left Over Block:Yes They are Yummy

Beth Shibley at Live Laugh Quilt
It's simple economy. You're working on a quilt. You cut up strip after strip of segments and sewed them together. Were we counting? Don't be silly. We were sewing!


From Dianna at Wedding Dress Blues

And somewhere in the middle of all of that there's an extra block. Yepper. 64 blocks needed. 65 blocks available. What does divide evenly with 65? 13x5? That's an odd quilt size. 
But we can't waste it, can we?


From Lily's  quilt
Before this all leads to tears, let's think it through.
No one sews evenly every time. Inexplicable things happen to your fabric that sometimes makes a block too large, too small, just unusable. Aren't you glad you made an extra?


From Jess at Life Under Quilts


A left over block is a wonderful starting space for a new quilt. It's like a special seed sitting safely in your sewing room, waiting to become a wonderful new and different quilt.


It's not new either, although it always looks modern because it's largely random. Now we call them Orphan Block Quilts. But we've always had left overs and we've always served them up later.
From McCalls Quilting
How can we stretch a small pile of left over squares into a quilt?

  • Put it in the center and put borders around it.
  • Add an extra kind of block to fill in.
  • Add an odd and unexpected element.
  • Put lots of left over kinds of blocks together.
  • Give up on the quilt idea and make something else: a tote bag, a pillow, decoration for your jacket, a pot holder. This goes on forever.

Orphan Block Quilts
Tricia Lynn Maloney has written a very helpful book called 

Orphan Block Quilts: Making a Home for Antique, Vintage, Collectible and Leftover Quilt Blocks. You'll find that a very nice guide for your journey into leftovers. They're especially tasty!

Friday, May 2, 2014

Fusible Applique: Lickity Stick

Pictures from Thread Magic Garden, by Ellen Anne Eddy
Hand applique is pretty. Calming. Historic. A bit time consuming.
So is there a way to speed this up? Of course there is!


Fusible applique is the lickity split way to applique. Instead of turning your edges you either cover them  with some kind of stitching, or you don't. But either way, you fuse the applique pieces to your top fabric first.

Kinds of fusibles
Fusibles come in several classes

  • Unbacked: 
These are raw spun webs or films of nothing but glue. They have no paper backing. Some of them are formulated to be less stiff. You need to be really accurate to use these. You want to applique piece to completely match the glue so it's really stuck and so it doesn't bleed glue around the edge. You probably want to use a teflon ironing sheet to protect your iron and ironing board.


Backed: Paper backed fusibles have a paper backing. It protects your ironing board and  iron. It can be ironed onto the fabric and then you cut the applique pieces. Which means it really is accurate and you don't have glue bleed. These fusibles have one paper side and one glue side.
  • Tacky: These fusibles can be finger pressed onto your fabric, cut and then ironed down. Like a peanut butter sandwich you have two pieces of paper, and glue in the middle. You peel one side, pat it on to your fabric and cut your shape. Then  iron it down.
Web textures
Most webs have a texture of some kind. It will show through. Films and webs work better than webs with a formal glue structure on the back. Of course if you stitch enough on it, who will know?

Some of the first fusibles have been around for over forty years now, and have proved permanent. But  I don't ever trust it as a finished product. You might if it's:
  •  a piece you never intend to wash.
     If it's just going up on your wall, it's probably fine, but cleaning it is going to be dicey if you ever need to.

  • a piece that will never be rough handled. Keep in mind that shipping or traveling quilts to show can be very rough handling. 

Most people stitch after they fuse in some regards. But fusing fabric changes its texture. It's much harder to stitch through. So stitching by machine is probably the way to go.
Next time we'll talk about machine stitching applique.

Wednesday, April 30, 2014

Hand Applique: The Embroidered Edge

From Rocky Mountain Quilts


There's another traditional form of hand applique.

Rather than make the stitches invisible, you can pump them up and make them shine.
From Mrs. B's General Store
This became particularly popular in the thirties. There were a lot more applique quilts as cotton fabric more available and didn't need to be in tiny pieces. 
Found on ebay.com
Many quilters decorated their edges with embroidery.
Very basic embroidery stitches work really well as a way of edging an applique. Most people stitch the fabric down as classic applique and then embroider them with basic edging stitches. The running stitch, the stem stitch and the buttonhole stitch are some of the best.

Embroidery cottons from Threadarific
All kinds of cotton embroidery threads work for this. Pearl cotton, embroidery floss and crochet cotton come in different sizes and every color.


Patsy Thompson Designs

This also looks really great on wool applique.
From Aurum Eve


From Fiber Luscious

Of course there's no reason it has to look old fashioned because it's old. It's a way to dress up and excite all kinds of contemporary design.

Sunday, April 27, 2014

Applique by Hand: Zen for Stitchers

For many quilters, hand is a four letter word. We grew up with machines, our time was limited, and you can do a lot more sewing if a machine is sewing with you.
Sue Makinen
So, why would you choose to applique by hand? For the very reason we really choose to do anything. Because its fun!

It has some other great qualities as well. 
  • It's portable.
  •  It's calming.
  •  It can be done anywhere.
  •  It doesn't take your full attention, so you can do it chatting, talking, or watching TV.
We're going to look at several different applique techniques over the next week. There may well be as many applique techinques as there are quilters, but there are some classic ways to  do this that make your life Feasier.

Does it have to be old fashioned? Don't be silly. We can take all kinds of designs and use the techniques that work best for us. There are no rules. Merely suggestions.
from Cottontail Quilters

The most classic applique technique is needle turned applique. It's old school but it's lovely. You use the needle to turn the applique edges over as you stitch.
From Hetties Patch

The starting point is where you mark and cut your applique pieces.The tradition is that you trace them. You can make a pattern of paper, cardboard, freezer paper, pattern plastic or sand paper and trace endless pieces on your fabric. You cut them out with a 1/4 inch edge around them.

You can also take a running stitch around the edge and pull it in to turn your applique edge.


But there are some cool alternatives. You can also iron freezer paper  on to your fabric, cut out with your edge allowance and iron it down, with the paper in it.
Inklingo Pattern

Or there's a new product called Inklingo, where you can either print your pattern on paper of some kind or print the fabric itself. This is a real time saver and it ups your accuracy considerably.
From Martingale Press

In the end, you whip stitch the turned over edges invisibly to your top fabric.


It's not fast. But it is especially lovely. And it's probably what your grandmother did. Unless your grandmother was a dyed in the wool machine girl. Yes, they've always been out there. 

Next time we'll explore  applique with embroidery stitches.

Friday, April 25, 2014

Exploring Piecing and Applique: Yes, You Can Do It All

Applique quilt from Quilt Sister
You've probably heard people declare, I'm a "piecer", or" I do applique". They really are very different techniques.And they offer such different possibilities. We're going to look at applique over the next week, but before we do that, let's unpack the differences.


From Fussy Cutter Quilter Kits
Piecing is the sewing of fabric together in seams. We've talked a great deal about piecing. It's usually where beginning quilters start.

Piecing is almost always in straight lines. Except when it's not. There are fabulous curved piecers and piecing, but it's a high skill trick. Much piecing that looks curved is actually an optical illusion. It's worthy, it's lovely and it's very exacting.


Sue Makinen's Applique 
Applique is applying fabric on top of another fabric. Applique is the land of the curve. There is straight line applique, but one is tempted to ask," why?" It's so much easier to piece straight lines and so beautiful to applique curves.


by Barbara Baatz Hillman
There's also nothing against both piecing and applique within the same quilt. It's an astonishing combination that gives you the best of everything.


From Thimble Lady


But that being said, there are a lot of techniques within that. The biggest decision is whether to work by hand or by machine. 
There are wonderful reasons for both.


Hand applique is

  • Elegant and delicate
  • Can be intricate
  • Traditional
  • Portable( you can easily carry it with you)
From Sew Momma Sew
Machine Applique is
  • Faster
  • Less Intricate
  • More contemporary (usually)
  • Needs to be done in your sewing room with your machine.


In a way, the differences are almost along personality lines. Do you need to finish up fast, or do you want to do a long term masterpiece?
Both are fabulous. Applique is a wide world and we'll explore a good chunk of it. 
Sue Makinen is teaching a class on  hand applique for us on Saturday May 3rd, at 10:30-3.You can find more about Sue on our Blog Post Applique Treasures: Sue Makinen.

Wednesday, April 23, 2014

Strip Piecing: It's all in How You Slice It

My father had a saying. If it's too hard, takes too long, or is to nasty, you're using the wrong tool or technique. This is always true in quilting.

Piecing little tiny bits of fabric may be a zen technique and may well sooth some souls, but most of us want to get on with it. It's a lot easier to sew and cut up strips than it is to sew tiny bits.
And Sew much more fun!

Remember all the wonderful blocks that we can  make out of half triangles. Take a collection of sewed strips, cut half triangles and find yourself with the basics for endless half triangle square blocks with tiny intricate strips. For very little effort.

Then the fun begins. They can be turned, twisted and sewed into so many possibilities.

By the way, this is much more fun if you have a photo wall. Take a sheet of Blue Dow( or another Styrofoam insulations). The 3-4 inch ones will stand up on their own. You can ask the person at the hardware store to cut it to whatever size fits your room. Throw a sheet over it or some other fabric ( I use black double knit. Which you can usually find most likely in an Amish shop). You can endlessly pin your squares up in any way, walk away, and look at it. Not only is that endless fun, but it's the best way to view your design. And when it's time to photo your quilt, you're ready.