Threadbenders Quilt Shop

Threadbenders Quilt Shop

Friday, March 14, 2014

Long Arm vs. Mid Arm: What would you do with a long arm?

Some quilters love to piece. Some quilters love to quilt. Why not do the thing that pleases you most?

For those of us who love to quilt, there is long arm lust.
What do I mean?


There are things your regular home sewing machine just doesn't do well. Like sew at a million stitches per minute and make room for big quilts with fat bats. If you've ever spent a month stuffing a very large quilt through the very small hole in your machine arm, you know what I mean.

Enter the long arm. A long arm is a machine based strictly for quilting. It can be hand guided or programmed. It can accommodate almost any size quilt. They started as a utilitarian machine, but many quilters are finding their art with a long arm that gives them so many more options. And if you lust over those quilts with massive, fabulous quilting, very often you're looking at long arm work.

There's really only two problems with a long arm. You have to stand up to use it ( or have a good movable seat). And they do pretty much take up a room.

Enter the mid arm. A mid arm machine has pretty much the same head (machine top) as a long arm. But it's set up for sitting sewers. And it takes up so much less space. 


Here's a comparison.
Long Arm                                   Mid Arm
Sew standing up                         Sew sitting down
Takes up a lot of space               Takes up the space of a home machine
Can be programmed                   Can’t be programmed
Move the machine head to sew    Move the quilt to sew
Handles all size quilts                  Handles most larger quilts

Fairly expensive investment         More moderate investment


Here's the good news! We have both a long arm and a mid are demo machine on sale. Come in and see what you might do if you had a long arm.

Wednesday, March 12, 2014

Binding with Bias

You know you're not done with a quilt until you put on the binding. There are as many ways to do that as there are quilters. Some of us love it, some of us hate it. But if you want your quilt protected you have to finish the edges somehow.


commercial bias
Since we've been talking about bias, we thought we ought to include the queen of bias, bias tape.
Many quilters prefer bias binding for the smooth edges it gives, even with curves.

You can buy packaged bias in a lot of colors, but that doesn't always mean it will match your quilt. Is it the same weight? The same shade of red? The same fabric content? Most commercial bias is poly cotton rather than all cotton and it does look different.

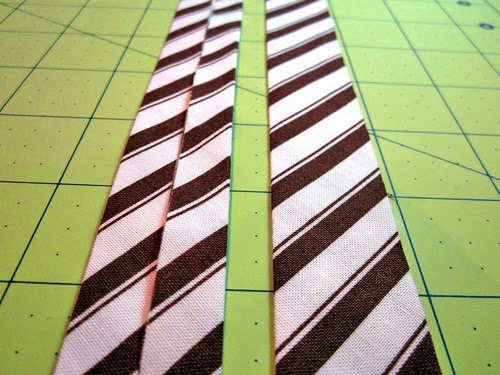
Bias binding is simply fabric cut along the bias in even widths. Usually it's folded and sewed along the folds. Traditionally is folded in 4ths, so if you have a two inch wide strip your finished binding will by one half inch.


picture by Liesl Gibson
Once you sew the strips together, you can fold it using a bias tape maker.
Bias Tape folded from Sew4home
Your own bias will match your quilt it a way commercial bias never will. Besides striped fabric always looks fabulous on the bias.

Of course commercial bias is sort of like instant mashed potatoes. It's there in a hurry but it's never quite as good.

Sunday, March 9, 2014

On Point: Turning a Corner with Your Quilts

We've talked some about bias cuts and how they respond to piecing and ironing. This is the fun designer part about bias.

Let's start with a simple square quilt block. 


We're all familiar with sewing those blocks into a grid. It makes a nice repeat but it doesn't have a lot of design action. Sometime's you'd really like to feel like a design is moving.
So, turn it on point. Turn in 45 degrees ( like a right triangle) and watch it change. Are you more excited now?
Not only that but we can turn our grid into a square on point and add triangle pieces to fill in the corners.
Now imagine what happens if you went modern with that. An odd grid gives it even more personality and energy
None of this is hard. It's a matter of looking at things from different angles. Try taking your favorite quilt blocks, putting them on point and see how they change.
Things to remember:
Once you put something on point, somewhere you'll have to use a triangle shape to square it in. That triangle shape does have one side that is bias. And it will stretch.
But you already know what to do with that.

  • Pin, pin, pin.
  • Use a walking foot.
  • Don't stretch the edges as you sew.
  • Pick your iron up and then set it down. Don't push the fabric by ironing flat.


Friday, March 7, 2014

Biased: Introducing Bias Cut Fabric


We talked last time about the construction of fabric and what " straight grain" means.
From Threads Magazine
Basically it means the fabric is cut along the line with either the warp grain( the long threads of the fabric) or the weft grain, (the threads going across).  Fabric is just woven threads. It's not static. The threads can easily shift within the fabric.So it can stretch, warp, or shift on you in a moment's notice.  The straight of grain fabric does that slightly. But what if you cut at a 45 degree angle across the square. The picture shows us a log of thread ends with nothing to hold them in place. That 45 degree cut is a bias cut. And since the threads aren't holding each other in place, it stretches. Not just a little bit. A lot! 
Is that a good thing? Again, nothing is  good or bad but thinking makes it so.
You may think this talk about grain doesn't matter to beginner sewers, or people making simple quilts. But it helps you predict how fabric will react as you sew it. And if you think it through, you'll understand some of the problems involved with sewing bias and some of the solutions.
Elizabeth Hartman from Oh, Fransson!
Remember how we talked about half square triangles, and how many different kinds of blocks you can cut from them? That seam across the half square triangle is bias cut. Any quilt we make with triangles or diamonds by definition has a bias seam, waiting to stretch out before your eyes. 


Before you start to panic, quilters have dealt with this from the beginning of quilting. And knowledge is power. Are you wondering why one square is bigger than the other? Pointed slightly differently? Why the seams don't match. It could be due to bias stretch. Here's some ways to control that,
From Exuberant Color

Bias coping skills
  • The simplest thing to do about bias is to remember not to stretch it. Don't pull it through the machine. Don't tug it into place. Don't encourage it to stretch more than it does just in sewing.
  •  Cut accurately and trim to even things out rather than stretch a seam to make it match.
  • Use a walking foot to make your fabric feed evenly top and back side. A walking foot grabs fabric from both the top and the back side.
  • Use pins. A lot of pins
  • Don't drag your iron along the seams. Lift it. Place it. Let it steam. Repeat.
If it stretches a little, that's fine. Just don't encourage it to stretch a lot.
From Nettie at aquiltisnice
Is there an upside to bias? Actually yes there is! That curve you see on this bound edge is from cut bias strips. The bias stretches nicely to accommodate the curve. Many quilters use bias binding because that stretch leaves a smoother bound edge.

We'll talk more about bias binding next time!


Sunday, March 2, 2014

Sewing Against the Grain: Knowledge is Power

Thermoweb.com
When most of us start to quilt we usually start with projects that look pretty easy. Square pieces, simple straight lines. So why is it that we're sewing along and all of a sudden the seams we pinned don't match and one side is a lot longer than the other.

We think of fabric as being square. That's not really true. Fabric is thread woven. Those threads can and do shift within the fabric. Fabric is only square if we cut it square. And that can change when we pick it up and move it.

Illustration Janet Wickell
The secret is in the weave. The long threads of your fabric going down the length of your cloth  (the weft) are tightly stretched in the weaving. The threads that go back and forth between the edges of your cloth ( the weave) is placed between the stretched weft. They don't have the same tension on them so they are never as tight. What does that mean? The weave edge of your fabric is stretchier than the weft.

When we're cutting our fabric we think of straight of grain. Both weft and weave are straight grain. But they don't act the same way. The weft is much more likely to stretch. And it will stretch right under your sewing machine foot.

Is this a good thing?
A bad thing?
Nothing is good or bad if thinking makes it sew.

Back to our seam. It makes sense if you sew a weft cut piece to a warp cut piece that one will stretch more. Here's some strategies that help us work around that.

  • Pin everything well. It will move some. We just want it to move less.

Janet Wickell About Quilting 
  • Cut cleanly. Clean rotary cut fabric is  is always easier to sew because it's more accurate. It's impossible to sew torn fabric evenly because the edge stretches in the tear.
  • Consider sewing strips and cutting them in segments for construction. It's much more accurate.

  • Even up squares before you stitch them together. You're seams aren't completely even in the block? A swift round of rotary cutting each block to exactly the right size can save you a lot of trouble later.
    Amanda Herring The Quilted Fish

  • Sew long strips together from the same side. I know it's awkward. But your strips will stretch the same way and iron much better.

  • Use a sewing machine foot that helps you keep your seams even.  A  consistant 1/8 inch discrepancy in a nine patch makes for blocks that can be 3/4" different in size. Accuracy does count.
    Faith Jones of Fresh Lemons Quilts

  • If you have one side of a piece your piecing that is longer, you can put that on the bottom. The top will stretch and the bottom will not.

  • Finally figure out how much accuracy matters to you. You are the only judge here. If you're happy with your results, no one else gets a say about that. My grandmother's quilt seams didn't match either. I'm upholding a fine tradition.
Janet Wickell has a great article fabric grain  at  quilting.about.com.

Faith Jones also has a great article for making seams match on Quilting Gallery. 

Next time we'll talk about the exception to all of this, bias.


Saturday, March 1, 2014

Aphabet Soup: Say it in Fabric Letters


Wanda's letters
Whether it's a baby quilt, an art quilt that needs to say something or a journal quilt that depends on words for design, it's good to have a fabric alphabet. We'll explore some of the ways we can do that, both on and off a quilt.


The ideal thing is a beautiful printed panel of alphabet letters. These letters were a panel piece that was fussy cut sewed onto another  layer of cotton with bat between. Pinking sheers make the cool serrated edges. Our resident MacGyver, Wanda, made the batch above.
Of course the alphabet is an endlessly interesting toy, and every little kid would like to put it in their mouths when they're not spelling with them. So nice play with cotton letters are a great use of scraps and always appreciated.
Happy Together Creates
There are some great tutorials on making cloth letters. Jessica, on Happy Together  has made rag letters that have frayed edges that soften when washed.
Threading my way
Pam from Threading My Way has another tutorial that shows sewing the cloth letters onto felt. Both of these processes involve blowing up a letter on your computer to a 8 x 11 inch size and using it a a pattern. Choose a font that's a bit bulky and not to complicated, as you'll be cutting them out. Both of these alphabets are cute as buttons.


cut paper letters
There's also another way of cutting letters. This is an old primary teacher trick for free cutting letters out of paper. I found it in the New Zeeland Digital Library, but it was something I learned from my teacher mother. It's another great way to cut out letters.

Of course the same letters you cut separately for a child's toy can be appliqued anywhere.


Whatever you choose, it's a great toy for a toddler, a great use of scraps and a lot of fun for you.

Wednesday, February 26, 2014

Fussy Cut Applique: Modern Broidery Perse


We' ve been talking about piecing with those great novelty prints. And it's a whole lot of fun.
But there is another way: applique!


Broidery perse one of the earliest American quilt techniques. The very first prints in England and America came from India. They were extraordinarily expensive and frugal quilters used them very sparingly. So they would cut out some of the fabulous flowers and paisleys and applique them onto a white/cream background. Tree of life was one of the most popular patterns. The flowers/foliage on the tree would  be cut and appliqued from the chinz.
P&B Textiles
Of course, everything old is new again. Quilters have rediscovered fussy cutting as a way to applique those amazing english rose prints and more.


Original broidery perse was needle turned, hand stitched and very labor intensive. There are people who still have that skill, but modern fusible webs give us another alternative.
The Crafty Quilter
You can back your applique flowers with fusible, fussy cut them to your delight and apply them with a hot iron. A talented sewing machine with a button hole stitch makes a darling edge. Or an inobtrusive zigzag will work in a pinch.


You can place a fabulous image from your print right where you want it. How cute is that!